The article presents a method for studying digital images of artificial crowns made using modern digital technologies (intraoral scanner iTero Cadent, CAD/CAM-system KaVo ARCTICA, 3D printer Asiga Max UV) and a laboratory method using hot polymerization of acrylic plastic. Based on the research, it is concluded that temporary artificial crowns made with the help of modern digital technologies have greater dimensional accuracy.
Keywords: digital impressions, CAD/CAM, intraoral scanner, dimensional accuracy of artificial crowns, digital technologies in dentistry.
Introduction. Recently, digital subtractive [1, 5] and additive technologies [6] for manufacturing orthopedic structures have become widespread in dental practice. Digital methods for creating non-removable dentures are based on obtaining virtual images of patients' dentition using intraoral or laboratory scanners [4] and computer modeling and automated production using CAD/CAM systems (subtractive method) or 3D printers (additive method).
The creation of permanent temporary dentures used to protect natural teeth prepared for artificial crowns is possible using digital technologies or using the method of hot polymerization of acrylic plastic. Previous studies have reported on the dimensional accuracy of non-removable dentures obtained using milling and grinding machines [2, 3]. At the moment, there is little data on the accuracy of temporary prostheses made using 3D printers, which justified the need for further research in this area.
The aim of the study is to study the dimensional accuracy of temporary artificial crowns made using subtractive and additive technologies.
Materials and methods of research. To conduct the experiment, we developed a special research scheme, which used an experimental model (Fig. 1) with a 2.7 tooth prepared for an artificial crown with a circular ledge in the form of a groove.
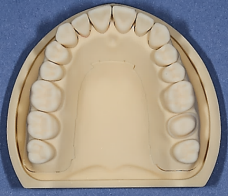
Fig. 1. Experimental model
At the first stage, 10 digital images of the experimental model were obtained using an iTero Cadent intraoral laser scanner (USA). The DentalCAD 2.2 Valletta software was used to simulate temporary artificial crowns for the 2.7 experimental model tooth stump. For all artificial crowns, a cement gap of 50 microns was set during virtual modeling.
At the second stage, 10 temporary artificial crowns were made from polymethylmethacrylate VITA CAD-Temp monochrome in the KaVo ARCTICA Engine milling and grinding machine. At the third stage, 10 artificial crowns were made using a 3D printer Asiga Max UV from a biologically compatible micro-filled hybrid material NextDent C&B MFH.
At the third stage, two-layer single-stage silicone impressions (Express STD, Express XT Regular Body, 3M ESPE, USA) were obtained from the experimental model and 10 collapsible models were made from high-strength Fujirock gypsum (GC, Japan). Wax blanks of artificial crowns were created by immersion until the required thickness was obtained. Spigots were modeled, molded into a flask, wax was melted, and 10 temporary artificial crowns made of SinmaM acrylic plastic were made using hot polymerization. Then, using the KaVo ARCTICA AutoScan laboratory optical scanner, digital images of the experimental model and all temporary artificial crowns obtained during the study were obtained.
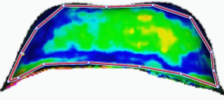
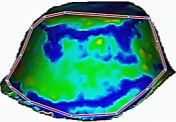
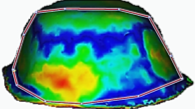
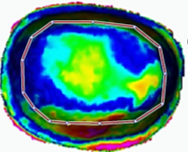
At the fourth stage, digital images of the experimental model and temporary artificial crowns obtained during the study were obtained using the KaVo ARCTICA AutoScan laboratory optical scanner. Then, digital images of the tooth stump 2.7 of the experimental model were combined with digital images of temporary artificial crowns. The combination of digital images in the DentalCAD 2.2 Valletta software is performed automatically: the program independently recognizes identical points in the three-dimensional coordinate system, along which the two virtual objects under study overlap. As a result of superimposing digital images, color fields appear on the digital stump of tooth 2.7 (Fig. 2).

Fig. 2. Combined digital images with color fields
Each color corresponds to a certain amount of discrepancy between the combined digital images (Fig. 3).

Fig.3. Color scale for determining the amount of discrepancy between digital images
The combined virtual images obtained from the Dental CAD 2.2 Valletta software were exported to the 3D PDF computer software application (Adobe Acrobat Document) in standard positions: mesial-contact, distal-contact, lingual, vestibular and occlusal surfaces. The linear dimensions of these objects were the same in all cases. A section of a certain area was allocated on each surface of the tooth stump to measure the color fields inside it (Table 1).
Table 1
The areas selected for analysis on different surfaces of the stump 2.7
|
View of the stump surface |
Area (sq. mm) | |
|
Mesial-contact surface |
2073,17 | |
|
Distal — contact surface |
1566,52 | |
|
Vestibular surface |
2321,94 | |
|
Lingual surface |
2422,65 | |
|
Occlusal surface |
1754,25 | |
|
The total area of all surfaces |
10138,53 | |
On each surface of the stump in the selected area, the area of color fields corresponding to the following ranges of discrepancy between the combined digital images was measured: 0.00–0.02 mm (blue color field), 0.02–0.05 mm (green color field), 0.05–0.08 mm (yellow color field), 0.08–0.1 mm (the color field is orange) and more than 0.1 mm (the color field is crimson). When a color field is selected, the 3D PDF program automatically calculates the area of this area (Fig. 4).
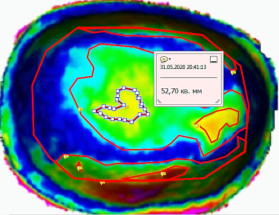
Fig. 4. Measuring the area of the color fields of the combined digital image of the artificial crown and tooth stump 2.7 of the experimental model in the 3D PDF computer program
The results of the study. The average measurement values of combined digital images of temporary artificial crowns made by various methods and the tooth stump 2.7 of the experimental model are shown in Table 2 and Figures 5, 6.
Table 2
Measurement results of combined digital images
|
The method of making artificial crowns |
The area (square meters) corresponding to a certain range of discrepancy between the combined digital images of temporary artificial crowns and the tooth stump 2.7 of the experimental model | ||||
|
Ranges of discrepancy between combined digital images | |||||
|
0,00–0,02 мм |
0,02–0,05 мм |
0,05–0,08 мм |
0,08–0,1 мм |
Более 0,1 мм | |
|
KaVo ARCTICA |
3409,61 |
5932,20 |
704,11 |
89,11 |
3,51 |
|
3D printer ASIGA |
3504,66 |
5845,49 |
684,98 |
94,59 |
8,81 |
|
Traditional technology |
470,87 |
840,92 |
5558,72 |
2313,17 |
954,85 |
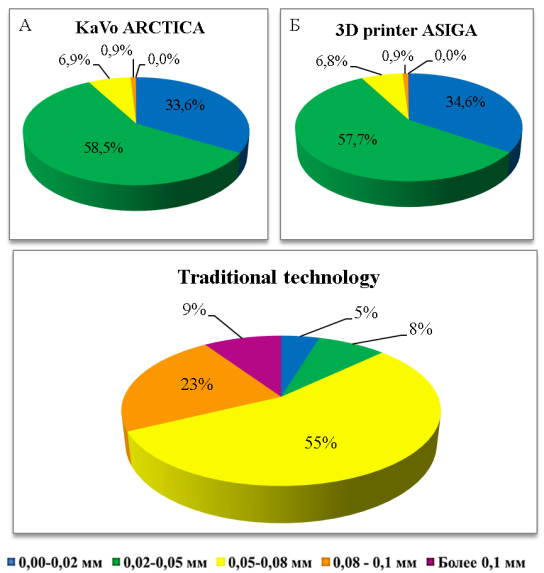
Fig. 5. Diagram of the distribution of the percentage ratio of the areas of the color fields of the combined digital images of temporary artificial crowns and the digital image of the tooth stump 2.7 of the experimental model. Methods of manufacturing artificial crowns: A — CAD/CAM KaVo ARCTICA; B — 3D printer ASIGA Max UV; C — traditional method using hot polymerization of acrylic plastic
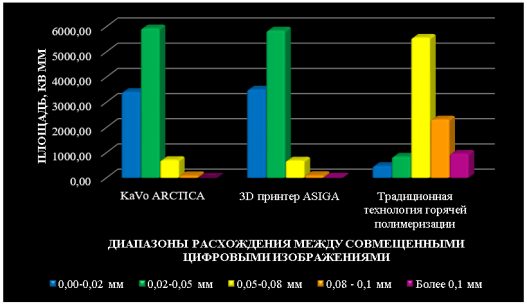
Fig. 6. Histogram of the distribution of the ratio of the areas of the color fields of combined digital images of temporary artificial crowns made by various methods and the digital image of the tooth stump 2.7 of the experimental model
The results of the study showed that for temporary artificial crowns obtained using the KaVo ARCTICA CAD/CAM system, the largest percentage (58.5 %) of the virtual surface area of the combined digital images of temporary crowns and tooth stump 2.7 of the experimental model corresponds to the range of 0.02–0.05 mm of discrepancy between them. For temporary artificial crowns obtained using the Asiga Max UV 3D printer, the largest percentage (57.7 %) of the virtual surface area of the combined digital images of temporary crowns and tooth stump 2.7 of the experimental model corresponds to the range of 0.02–0.05 mm of discrepancy between them. For temporary artificial crowns obtained by the method using hot polymerization of acrylic plastic, the largest percentage (55 %) of the virtual surface area of the combined digital images of temporary crowns and tooth stump 2.7 of the experimental model corresponds to the range of 0.05–0.08 mm of discrepancy between them.
Thus, the smaller the range of discrepancy between the combined digital images of temporary artificial crowns and the prepared tooth stump 2.7 of the experimental model, the greater the dimensional accuracy of the artificial crowns.
Conclusion. The data we obtained allowed us to conclude that temporary artificial crowns made using digital technologies have the greatest dimensional accuracy (57.7 % of the virtual surface area of combined digital images of artificial crowns and the tooth stump corresponds to the range of 0.02–0.05 mm of discrepancy between them) in comparison with artificial crowns, obtained using traditional technology using hot plastic polymerization (55 % of the virtual surface area of combined digital images of artificial crowns and tooth stump corresponds to a range of 0.05–0.08 mm of discrepancy between them).
References:
- Zhulev E. N., Vokulova Yu.A. Results of studying the quality of the edge fit of zirconium dioxide frames made using iTero Cadent intraoral laser scanning technology in an experiment // Modern problems of science and education. — 2017. — No. 1. P. 5. URL: https://www.science-education.ru/ru/article/view?id=25903
- Zhulev E. N., Vokulova Yu.A. Study of the dimensional accuracy of the internal fit of artificial crowns to the stump of the supporting tooth and digital impressions in an experiment // Kuban Scientific Medical Bulletin. — 2016. — № 6 (161). — pp. 58–62.
- Ryakhovsky, A. N. Digital dentistry. Moscow: Avantis LLC; 2010. 282 p.
- Shustova V. A., Shustov M. A. Application of 3D technologies in orthopedic dentistry. Saint Petersburg: SpecLit; 2016.
- Kim CM, Kim SR, Kim JH, Kim HY, Kim WC. Trueness of milled prostheses according to number of ball-end mill burs. J Prosthet Dent 2016;115:624–629.
- Kirsch C, Ender A, Attin T, Mehl A. Trueness of four different milling procedures used in dental CAD/CAM systems. Clin Oral Investig 2017;21:551–558.

