In this article, the author describes the process of creating traditional pottery ceramics and explores the approach of modern technological methods of decorating.
Keywords: ceramics, pottery art, wheel throwing, milk coating, polishing, black polishing, bisque firing, glost firing.
В статье автор описывает процесс создания традиционной гончарной керамики и исследует способ современного технологического подхода к декорированию традиционных изделий.
Ключевые слова: керамика, гончарное искусство, молочение, лощение, чернолощение, утильный обжиг, политой обжиг.
Introduction
Traditional pottery ceramics, despite their high artistic and decorative level, were primarily used for utilitarian purposes — for everyday use. Typically, they either had minimal decoration (lines and ornaments made directly on the potter's wheel during the creation of an object itself; applied decorations, reliefs, and imprints on the raw product; minimal painting) or had no decoration at all.
Traditional pottery items are perfect in their artistic design — they do not require additional decoration. However, in order to maintain their utilitarian qualities, they needed to be not only fired but also coated with other water-repellent materials. When the properties of clay were studied through its use in everyday life, it became clear that even a fired product allows water to pass through it because the structure of clay consists of small particles — flakes that retain their porosity even after drying and firing the product for utility purposes.
To impart water impermeability to the product, four main and most common methods can be distinguished:
—Milk coating
—Polishing
—Black polishing
—Glazing
Milk coating (Rus: Molocheniye) involves covering the product with milk. The product becomes water repellent due to the structure of milk, specifically the presence of casein milk protein. It is the casein that literally clogs the pores and thus makes the product waterproof. For this method, the previously bisque fired product is coated with milk. It is important to cover the inner part of the product since it is the part of the vessel that comes into contact with the liquid. However, the products are also coated with milk on the outside. Milk-coated items should be fired again, ensuring that the milk reaches the desired state without burning off. The firing of milk-coated products is carried out at a temperature of about 300–350°C (570–660°F) since at temperatures above 400°C (750°F), the milk completely burns off, losing its water-impermeability properties. Additionally, the milk coating technique gives the products a rich brown color of various shades, which is not only utilitarian but also a decorative solution.
Polishing (Rus: Loscheniye) is a method of creating water repellency in products through mechanical treatment of the raw ceramic piece. This method is quite painstaking and varies in complexity and time depending on the detail and complexity of the processed piece. The principle of polishing is applied before firing. For this, the moderately raw ceramic product, which has already acquired density but is not yet completely dry and retains sufficient moisture, is rubbed to a shine. Ceramic vessels were literally polished, which increased the density of the upper layer of the pottery item and enhanced water impermeability by smoothing the particles in the clay structure and reducing the porosity of the material. Tools used for polishing clay items were called «polishing stones» (Rus: Loschila) — any smooth objects, usually of natural origin — smooth stones, bones, and later glass and metal. Through polishing, the ceramic piece becomes smoother and shinier, and after firing, it acquires a slightly darker shade and water impermeability.
There is also a method called black polishing (Rus: Chernoloscheniye), which uses the same principle of pottery polishing, but the items are fired using a reduction firing technique. The main and most important element of this firing is the reducer, from which the method gets its name. The thermal treatment in this method is essentially the reduction of metals contained in the clay. Black polishing is applied to items that have already undergone polishing. Reduction firing involves firing with limited access to oxygen. For this, a reducer, usually of natural origin such as sawdust, wood, resin, and sometimes rubber in modern times, is added to the kiln at a temperature of 700–800°C (1290–1470°F). Oxygen is strictly blocked from entering the kiln, and due to the combustion, oxygen is consumed inside the kiln.
Sequential Process of Traditional Ceramic Form Fabrication Technology
This section of the research aims to examine the process of developing a project for a collection of pottery forms based on variations of traditional pottery ceramics.
1.1 Research Objective and Concept
The project's idea and objective involve the variational reconstruction of traditional pottery forms using contemporary techniques and decoration, while preserving the visual and chromatic aspects of traditional decorating and firing methods.
1.2 Determination of Practical Research Steps
To conduct the practical research, the following steps have been defined:
— Definition of the research project's goals and stages
— Blueprints for ceramic items based on traditional pottery forms
— Preparation and material testing
— Stepwise Execution of the Project in Material
— Drying and pre-firing preparation
— Bisque firing
— Glazing process
— Glost firing
— Conclusion and summary of the practical research
1.3 Blueprints for ceramic items based on traditional pottery forms
During this stage, the forms to be executed within the research project are determined. For the specific project, the following pottery forms have been chosen, including the following: Large Kvassnik (Toroidal Jug); Small Kvassnik; Candle holder; Baklaga; Rukomoy (hand-washing vessel), Large bowl, Medium bowl, Small bowl, Jug (Kukhlya), Jar (Krynka), Pot (Gorshok), Cups (Kumochki).
A watercolor drawing is prepared as a blueprint for the ceramic items. The watercolor technical drawing plays a pivotal role as it showcases the ceramic items in their natural size, presenting their color ratios and dimensional proportions within the ceramic set. Typically, the blueprint is made using watercolors, ensuring a true-to-life representation of the final ceramic set. The sketches are scaled and transferred with meticulous attention to dimensional accuracy.

1.4 Preparation and Material Testing
Upon careful planning and execution of the sketches and drawings, it is essential to proceed with material testing to verify the glaze's adherence to the clay, its desired shade, and its alignment with the project's concept and design intentions. At this stage, the mixing and preparation of the glaze play a fundamental role. Since the research project aims to combine traditional ceramics with contemporary decorating technologies, a specially formulated dark brown glaze with a metallic effect has been developed, yielding results that closely resemble the lustrous appearance of traditionally reduced-fired ceramic items. To ensure the resulting glaze possesses the required qualities and uniformly coats the piece's surface after firing, while also confirming the conformity of the vessel's forms to the predefined objectives, material testing is imperative: Pottery wheel throwing, Drying, Bisque Firing, Glazing, Glost Firing. The material testing was successfully carried out, substantiating the project's objectives.
In the context of the research project, a list and watercolor blueprints of the necessary pottery forms have been prepared. At this stage, the forms are being executed using the technique that involves going through all the stages of work on the potter's wheel. Complex composite items are made in detail, where each individual component is created on the potter's wheel and then joined together into a single piece using notches at the joints and bonding with a slip. Handles for the pieces are also separately made by hand using one of several methods and attached to the body. When the pieces are not yet completely dry but have significantly lost moisture, if necessary, the process of trimming and smoothing is carried out.
1.5 Stepwise Execution of the Project in Material
With all blueprints and tests completed, color solutions determined, and materials and tools prepared, the next step involves the final execution of the ceramic vessels in material. The set of pottery forms is executed on the potter's wheel.
The main stages of ceramics production on the potter's wheel are as follows:
—Clay preparation
—Clay centering on the potter’s wheel
—Formation of the base of a piece
—Shaping and pulling up the vessel walls
—Formation of the vessel
—Removal of the piece from the potter’s wheel
Clay preparation entails determining its moisture content, and consequently, its readiness for work, as well as wedging the clay. The preparation stage of the material is one of the most crucial in the entire process, as the quality of the clay directly influences the quality of the future piece. The important factor remains consistent — the final state of the clay should be moderately moist and homogeneous, without any compacted areas or trapped air, which could hinder the formation of a smooth piece or lead to deformation and damage during firing.
Clay centering on the wheel is a fundamental step in pottery wheel work. Once the clay is secured on the wheel surface, the process of centering begins. This process involves various techniques, often relying on physical manipulation, which includes several cycles of lifting and lowering the clay to wedge it and perform additional checks for the absence of compacted areas or trapped air inside. However, the final stage of centering always results in the clay being positioned precisely in the center of the wheel surface, without any deviations from the base to the top.
Formation of the base of a piece commences when the clay lump is fully centered. The clay is delicately pierced with the fingers at the center, and then the master slowly lowers the fingers vertically downwards, creating a hole while maintaining the desired thickness of the base, which can vary depending on the size of the future vessel (typically around 10 mm / 0,4 in). During the piercing and forming process, it is important to proceed gradually and slowly to avoid disturbing the centering of the clay. Once the vertical hole is pierced and brought down to the base with the desired thickness, the base is radially shaped and finally formed to the required diameter through straight motions from the center to the periphery. Forming the base requires maintaining the clay's centering and preserving the thickness of the future walls of the ceramic vessel.
Shaping and pulling up the vessel walls represent a stage that initiates the formation of the cylinder. After the vessel's base is formed, the next step is to shape the walls using both hands—one inside the vessel and the other outside, with the outer hand positioned slightly below the inner hand. Initially, a cylinder with uniformly thick walls is formed, without attempting to make them thin or immediately shaping the vessel's final form. This stage results in a cylinder with uniformly thick walls.
Formation of the vessel represents the final process carried out on the potter's wheel. The completed cylinder with uniform thickness is given the desired shape using various methods, based on the intended form of the piece. The master expands or narrows the cylinder at specific parts, forms the vessel's rim, and completes the work on the potter's wheel. Different variations of vessel forms exist, including open, closed, toroidal, and others. Depending on the desired form of the vessel, the subsequent stages of work may vary. After the stage, the next step is Removal of the piece from the potter’s wheel by cutting it with a string from the surface of the wheel.
1.6 Drying and Pre-firing preparation
Drying the vessels is a crucial process, the underestimation of which may result in deformation or damage to the pieces. The most important parameter during drying is the uniformity of the process. If the vessel dries unevenly, it can lead to cracks, deformation, or breakage. Therefore, it is necessary to consider the thickness of the vessel during drying, especially for complex composite pieces. Handles, spouts, decorative and small-sized elements, as well as the upper parts of the vessel, dry and shrink faster. Typically, these areas are covered to allow the thickest and heaviest part of the vessel to dry first, while the thinner elements are uncovered closer to the end of the drying process. Once the ceramic vessel has dried, the final treatment, known as washing, takes place. The piece is treated with a damp sponge, with particular attention given to the joints.
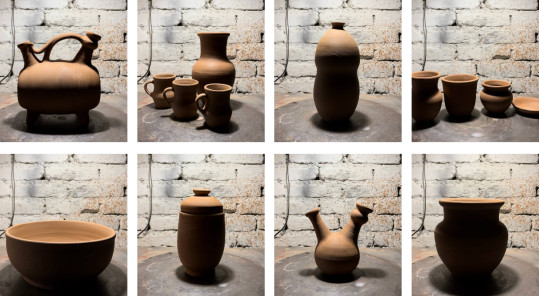
Fig. 2. Pottery before the bisque firing stage
1.7 Bisque Firing
Firing is undoubtedly one of the most important stages in working with ceramics, requiring specific knowledge and a skilled approach. It is crucial to arrange the vessels properly inside the kiln. The pieces may expand and increase in size when heated up to 600°C (1110°F), so they are placed in the kiln with small gaps between them.
The firing process is usually divided into the following stages:
—Kiln heating
—Holding at different temperatures
—Kiln cooling
All stages of firing are equally important and require a competent approach. Different materials, tasks, and objectives necessitate different kiln heating regimes. In the context of this project, the maximum temperature reached was 950°C (1740°F). Once the firing is conducted according to the required regimen, the kiln is cooled in a closed state until the temperature decreases at least 200°C (390°F), after which the door can be slightly opened to accelerate the cooling process.
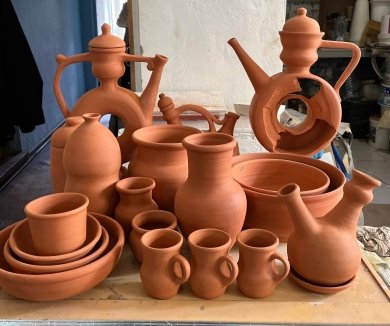
Fig. 3. Bisque-fired ceramics
1.8 Glazing process
In the context of this project, it is proposed to preserve the shades obtained during the process of milk coating and black polishing in traditional ceramics. To achieve this, a metallic glaze of dark brown hue was utilized, mixed and prepared during the material testing stage.
There are various methods for applying glaze, with the main ones being:
—Dipping
—Pouring
—Airbrush application
—Brush application
To ensure the uniform application of glaze in the project's context, the glaze was applied using an airbrush spraying method. To do this, the powdered glaze was first diluted in water to the required consistency and sieved through a mesh to prevent the formation of lumps and the presence of foreign particles that could result in uneven glaze application or clog the sprayer. Before using the airbrush to coat the external walls of the ceramic vessels, the internal walls of the vessels were also coated with the same glaze using the pouring method : an appropriate amount of glaze was poured inside the vessel, and the piece was tilted in different directions by hand to ensure that the glaze covered the entire internal surface of the piece and then swiftly and carefully poured out.
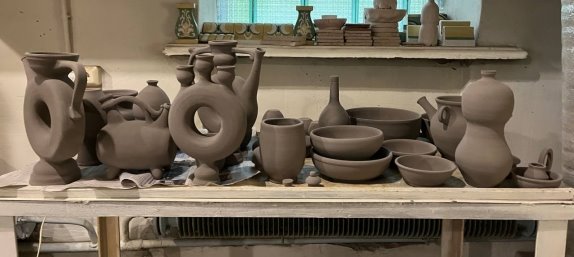
Fig. 4. Pottery after the airbrush glazing
The prepared bisque-fired vessels were placed in a specialized glazing cabinet—a confined space (box) enclosed on all sides except the front for the application process. Each vessel was placed on a turntable for ease of rotation and uniform glaze application. It is advisable to wear a protective mask and goggles during glazing to prevent glaze particles from coming into contact with eyes and mucous membranes. Once a vessel and the workspace are prepared, the glaze is gradually poured into a special container in the the airbrush and evenly sprayed onto the walls of a vessel. When the pieces are fully coated with glaze, they should be handled with utmost care to avoid damaging the delicate glaze layer. It is recommended to use polyethylene gloves for this purpose.
1.9 Glost Firing
Glost firing represents the final stage in the process of working with glazed pieces. Glost firing refers to the firing of previously bisque-fired pieces coated with glaze. The glazed vessels are carefully arranged in the kiln to prevent damage to the glaze coating. Glazed objects are always positioned in such a way that their walls do not come into contact with each other, as this could lead to fusion between the objects during firing. Separate elements of the vessels, such as lids and stands, are also fired separately from one another.
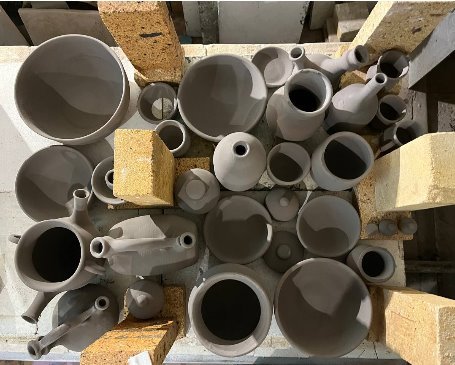
Fig. 5. Pottery at the stage of setting in the kiln
The firing process is carried out according to a specific firing schedule determined by the glaze's firing temperature. Afterward, the kiln is left to cool for approximately one day to prevent glaze cracks upon opening the uncooled kiln. Once the kiln has cooled down, the ceramic vessels are ready for use, both utilitarian and decorative purposes.
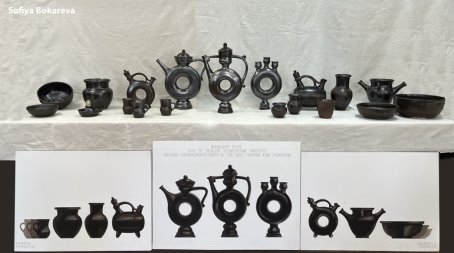
Fig. 6. Set of Traditional Ceramics Handcrafted on the Potter's Wheel (Blueprint and Final Products)
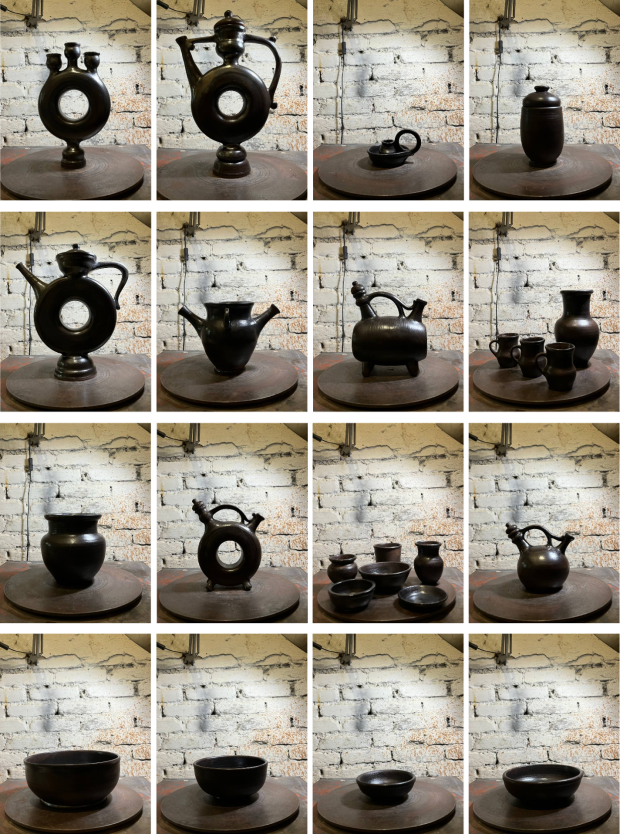
Fig. 7. Set of Traditional Ceramics Handcrafted on the Potter's Wheel
Conclusion
As a result of the conducted work, the sequence of the technological process for manufacturing traditional ceramics on a potter's wheel has been determined and described in detail. The step-by-step process of project development and implementation has been accompanied by pictures. Traditional pottery forms have been successfully created during the execution process, and the decoration has been carried out using a modern glazing method while accurately preserving the color scheme of the traditional ceramic vessels. The set of pottery forms, based on traditional ceramic shapes, consists of the following pieces: Large Kvassnik (Large Toroidal Jug); Small Kvassnik (Small Toroidal Jug); Candle holder; Baklaga; Rukomoy (hand-washing vessel), Large bowl, Medium bowl, Small bowl, Jug (Kukhlya), Jar (Krynka), Pot (Gorshok), Cups (Kumochki).
The research has provided valuable insights into the production techniques of traditional ceramics, combining traditional forms with contemporary glazing methods. The described technological process serves as a foundation for further research and experimentation in the field of traditional ceramics. Future investigations may focus on exploring alternative glazing techniques, investigating the impact of firing temperatures on the final product, and experimenting with different forms and designs based on regional pottery traditions. The research can serve as a valuable resource for artisans, researchers, and enthusiasts interested in the preservation and development of traditional ceramic practices.
References:
- Great Soviet Encyclopedia (in 30 volumes), Volume 12, 1971–607 pages.
- Kindzheri U.-D., Introduction to Ceramics, 2nd edition, translated from English, Moscow, 1967; The Art of Ceramics. Collection edited by N. S. Stepanyan, Moscow, 1970.
- Orlov E. I., Glazes, Enamels, Ceramic Paints and Masses, 3rd edition, parts 1–2, Moscow — Leningrad, 1937–1938.
- Poverin A., Pottery Encyclopedia, 2008–167 pages.
- Shteinberg Yu.G., Strontium Glazes, 2nd edition, Leningrad — Moscow, 1967.

